Wednesday, January 31, 2018

Tea Light Cake With Mini Cake Plate

Welcome to my stop on the Surprise Blog Hop. Check out Karen's entry on the Club Scrap Blog for a complete list of hoppers.

#tealight #clubscrap #birthdaycake

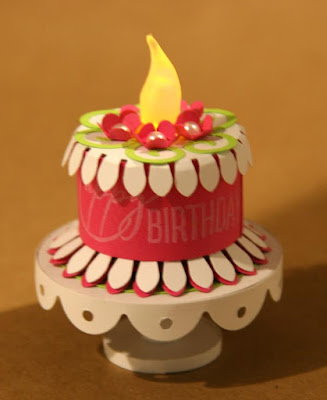
I created this miniature tea light birthday cake and miniature pedestal. Isn't it the cutest? This little project coordinates perfectly with the theme of Club Scrap's Surprise collection released this month.


It's just adorable when the tea light is turned on.

#tealight #clubscrap #birthdaycake #miniature

Here is a 6 second tour of this sweet little project:


This is a piece of cake to make!

Tips For Creating The Tea Light Cake

Cut decorative circles with a scalloped punch to create the base of the cake. Cut a Pink strip and create a loop to form the cake and to fit around a tea light. Adhere to the base with Bookbinding Glue dispensed from the Needle-tipped Applicator.


Place the tea light inside.


Make the cake topper with the same scalloped punch. Simply bend the edges around the cake sides and decorate with flower and swirl punches. Keep the cake top glue free for ease in turning the tea light on and off.


Tips For Assembling the Cake Plate with Pedestal

Cut circles from matte board and paper for the cake plate and pedestal base. Trim strips of white paper for the trim and pedestal assembly.


Cut a skinny strip of white paper to laminate the exposed matte board pedestal base. 


Roll a strip of paper into a cylinder and secure with Bookbinding Glue to form the pedestal.


Create a decorative trim with scalloped edged scissors. Adhere to the perimeter of the cake plate with glue.


Glue the plate to the pedestal.


Have fun displaying this mini cake on this mini pedestal because it's all in the present-ation!


Did you like this project? Then you will love this little Birthday cake in-a-box! Visit the Club Scrap Blog for details. 


Up next on the blog hop is Tricia Morris at her Efficient Crafter Blog! 

Thank you for stopping by,
Kay


SaveSave

Wednesday, December 27, 2017

Happy New Year Ornament

Welcome to my stop on Club Scrap's A Night at the Met Blog Hop Linky Party.


Create a wintery scene ornament to celebrate the New Year. It features A Night at the Met Stamps, Quad Print and Ribbon paired with Scandinavian Holiday Stamps and Scandinavia Lite Deer Woodcut. It's such a fun combination of kits & collections! 


The handmade shadow box made with mat board measures 4-1/4 x 5-1/4" and 3/4" deep.


Although Christmas has come and gone, my tree will be up for a while. This wintery scene ornament will be the perfect way to ring in the New Year!


Attach a ribbon loop to the top of the ornament for hanging with white mini brads. 


Happy New Year Ornament Assembly, a little bit about it....

Cut the mat board to size with a CS® Utility Knife and build the structure with CS® Bookbinding Glue.


Trim the Club Stamp A Night at the Met Quad Print into sections.


Adhere the Quad Prints with Club Scrap Bookbinding Glue applied with a foam brush.  


Stamp a 4x5" Black panel with a sentiment and snowflakes in White Pigment Ink.  Embellish the panel with Jewel Stickers. In the foreground, add a miniature tree, a tiny house made from paper scraps, and the Deer Woodcut colored with white acrylic paint. 


Be sure to return to the Club Scrap Blog for a complete list of bloggers and to enter your own project into the Linky Party.

Wishing you a very Happy New Year!

Thanks for stopping by,
Kay

Wednesday, November 29, 2017

Cutest Mini Calendar Refrigerator Magnet Ever!

Benvenuto!
Welcome to my stop on the Club Scrap Trattoria Blog Hop.

Refrigerator Magnet Upcycled with Club Scrap's Trattoria Collection

I've upcycled an old 3-1/4x4-1/4" refrigerator magnet with the Trattoria Quad print and Cutaparts.


Here's the recipe:

1. Trim the desired pattern from the Quad Print.


2. Brush Club Scrap's Bookbinding Glue onto an old refrigerator magnet and cover with the Quad Print.


3. Center a cutapart onto the magnet.


4. Print a mini calendar onto copy paper. I found this one on Pinterest.


5. Trim each month, stack, and bind together into a pad with Bookbinding Glue. Set aside to dry.


6. Attach the mini calendar and Fork Charm with Bookbinding Glue. Fill each mini bottle with salt, pepper, and other spices. Adhere the bottles to the top of the magnet with glue and wrap with Waxed Linen Thread.


"BAM!" (as Emeril would say). This is the cutest refrigerator magnet mini calendar ever!


Thanks for hopping with us. Next on the hop is Lilian at The Leaf Studio.

Bon Appetit!

Kay


Wednesday, October 18, 2017

Fabulous Folding Board

One of the many things shared at the 2017 Club Scrap Retreat was the Hammered Aged Copper Folding Board.


This super-sturdy board was a new medium for me to work with and wow, did I love it! It is perfect for all sorts of paper crafting construction projects. Pick up some in the Retreat "Pro Shop" soon as supplies are extremely limited.

Let's take a closer look at the folding board . . .


This paper product is 247 lb., making it heavier and more rigid than heavy cardstock, but lighter than matte board.

Card Folio

Check out Tricia's Card Folio Blog for the original detailed instructions on how to make this project. I decorated the cover and card set with the What A Ride stamps.


Gift Boxes

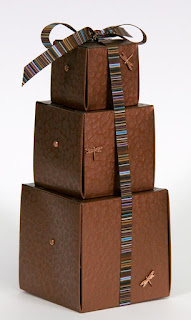
I created three ascending-sized boxes with the We R's Gift Box Punch Board. Simply tie the boxes together in a stack perfect for gift giving.


Card Box With Lid

This box was also inspired by Tricia's Vintage Botany Club Stamp Blog post. 


Gift Box Greeting Card

I've created this card design before. You might remember it from my Color Me Happy Blog Hop post


Memory Cube 

I had the pleasure of leading the Memory Cube workshop at this year's Club Scrap Retreat. The kit comes with all the pre-cut Folding Board and a handy video tutorial. The Folding Board sheets are in very limited supply. However, this fabulous kit is still available in the Retreat Pro Shop.


Thanks for taking the time to explore the many uses of Folding Board with me today.

Kay