Showing posts with label Handmade Box. Show all posts

Wednesday, September 28, 2016

Garden Shed Blog Hop

Welcome to my stop on Club Scrap's Garden Shed Blog Hop.
If you would like to start at the beginning of the hop and see the list of participants, please click HERE.


I've created a handmade box that houses a kettle stitched mini book with Club Scrap's beautiful Garden Shed collection. The finished box measures 5-3/4 x 3-1/2 x 2". The book inside measures 2-1/2 x 5" and contains twelve stitched signatures.


These were the basic assembly steps:

1. Trim Book Board pieces to size with a utility knife, cutting mat and CS® Grid Ruler. (Make several firm passes with the knife for each cut.)


2. Adhere the boards with GCS® Bookbinding Glue to create the box base and lid.


3. Wrap the lid and base with the Club Stamp Quad Print.


4. Decorate the pages of the book with stamped images from your stash, and stitch them together with waxed linen thread.


5. Decorate the cover of the book and the box with Garden Shed UM stamp images.


Now the fun of adding photos to the inside pages of the mini album comes in. 

I love the Garden Shed Collection!

Next on the hop is the talented Debbie at DebDuzScrappin. Go see what she's up to this month.

Thank you for stopping by,

Kay


Wednesday, August 27, 2014

What's The Cinema Without Music?

Welcome to my stop on this Club Scrap Cinema Blog Hop.


I'm on a Stacked Box Project kick, but this Cinema stack of boxes has a musical twist.


During last month's blog hop, Jill P. commented that these stacked boxes could be made into music boxes. Since reading that, I wanted to make one. Thanks, Jill! (But try not to put too many other ideas into my head this month, OK?)


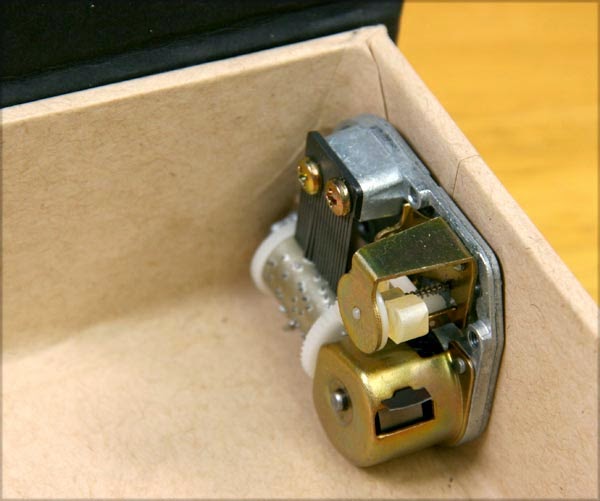
I used Cinema papers for wrapping the covers, text weight kraft for wrapping the inside box, music box mechanisms and the Paperless Components Boxes Kit.

In addition to following the kit instructions, I simply added drilling holes in the book board side wall of each box for the music mechanisms.


If you can find music box mechanisms that play show tunes, woohoo! All the better!


Next, you're off to see the amazing things Cathy has been up at The Artful Gamut. Thank you for stopping and enjoy!

Kay

Wednesday, July 30, 2014

Oopsie Daisy Stacked Box Project

Welcome, Oopsie Daisy Blog Hoppers!
If you would like to start at the beginning, the hop originates at Club Scrap Creates.

Club Scrap Stacked Boxes Project
My post for today is the newly-created Stacked Box Project. The paperless component option looks great wrapped with Oopsie Daisy Papers. This brand new kit is designed by yours truly and is available today for the first time! There are two great options: Complete Kit with Paper or Components Only.

The kit comes complete with instructions, so I'm not going to bore you with a lot of step-out details. However, here I am getting started by wrapping the covers below.


I used a text weight kraft paper splattered with a little black and white acrylic paint to wrap the box walls.


Adhere an Oopsie Daisy Print into the base of the inside of each box for a nice touch.


I painted the wooden feet black to give it a finished look.


The d-rings and brads for fastening the ribbon are included in the Components kit, along with those awesome wooden feet.


It's going to look great sitting on my desk and is a swell place to hide stash stuff, as well!


What would you put into these beautiful boxes? They measure 5x7, 6.5x8.5 and 8x10".

Also, here is the set I whipped up with the papers included in the Complete Kit. I added my own hardware, cutaparts, and rubber stamping for added embellishing.

Club Scrap Stacked Box Project Kit


Thanks for stopping by.

Next on the hop is Cathy at The Artful Gamut.

Enjoy!
Kay

Wednesday, May 28, 2014

Dungarees Mini Notecard Box

Welcome to the Club Scrap May Dungarees Blog Hop!

Go to the Club Scrap Creates blog where the blog hop originates to start at the beginning if you don't want to miss anything.

This month I've constructed a Mini Notecard Box. I was guilty of simply having fun while making this project and didn't make note of every measurement and step during the process.


The front of the box measures 3x4".


I cut pieces of bookboard using my utility knife and grid ruler and then attached with BookBinding Glue.


The box starts to take better shape after being wrapped with the Dungarees Club Stamp Text Print


I made a mini divider for the inside of the box and trimmed it to fit the opening.


The Dungarees Buttons and waxed linen worked well as a closure.


Thanks for checking out my Dungarees Mini Notecard Box.

Nest, visit The Artful Gamut to see what the talented Cathy Gray has in store!

Enjoy the hop!
Kay at Club Scrap

Monday, February 25, 2013

It's What You Make Of It

The month of February is flying by! On the 20th of each month our Club Stamp Kit ships, so the Up, Up & Away Club Stamp Project has found it way to our member's craftrooms now, already! I mentioned the beginnings of this project just two blog entries ago, when I worked up a prototype, so now it's about what this project grew up to be as The Art On A Sting Club Stamp Project, now available online.


Like many projects, it's what you make of it that makes it your own. This project has many possibilities and I enjoyed whipping up a couple variations :)
First, here I have the handmade box wrapped in the vintage balloon print papers provided in the kit. I finished the box off with Up, Up & Away rubber stamps on a couple nested cardstock panels. It may just look like a box wrapped with pretty paper to you at first, but once again, it's what you make out of this box.....

...the lid of the box holds the surprise here.


Little works of art are suspended from the lid. The printed hot air balloons are included in the kit for trimming out, coloring/altering and attaching, it's art on a string -- inside a box.


 I certainly could have stopped there with using the kit contents only for making the project, but I also wanted to use some of my own papers, metal hardware embellishments and rubber stamps to make a couple different looks from the same kit.


See, a completely different look on the same project.


I used Club Scrap's Serenity and Papillon rubber stamps on this project, the ivory paper I used to wrap this project is the plain side of the Club Scrap Logo Printed Gift Wrap.


This is the fun part, lifting the lid.


Side Note -- Man, it's really hard to hold the project still with my left hand as I try to snap the pic with my right! but you get the idea I'm sure.

I used two threads here to hang my rubber stamped butterfly and quote from the lid, using two threads stops the attached stuff from spinning. However I liked using a single thread per hot air balloon in the previous project because there is nothing to read on the balloons, and they simply look cute when they spin after pulling them out of the box.


Now lastly, for the project I made with photos inside, first about how I decorated the outside. 


The flip side, plain side, of the printed paper included in the kit is rubber stamped here with the Up, Up & Away Unmounted Rubber Stamps. Then I added color with colored pencils, rubbing on ink, spraying mists and applying glitter glue.


Now again, the really fun part of lifting the lid...


....a couple of photos nest inside this one. Basically I choose/created items that are symmetrical in shape, they can be glued back to back to sandwich the thread suspended from the lid.


Once again, heheee, it's really hard to get the hanging part of the project to stay still for photoing while holding it with my left hand and trying to take the photo with my right hand (no time for a tripod today, too many projects to make). It's really good I have long arms, but please excuse my blurry pic above! 


Another version of this project, that I have in mind but haven't gotten the chance to make yet, is simply decorating the outside of the handmade box by mounting photos on the outside. Maybe I'll get that one put together this week :) Looking forward to it.


It's what you make of it that makes a project special to you!
Thinking this project is a perfect example of that for me:)

FREE KIT ALERT!!!

TAKE ADVANTAGE WHILE I'M SO EXCITED ABOUT THIS KIT -
COMMENT ON THIS BLOG AND ON MONDAY, MARCH 4TH, 2013 I'LL RANDOMLY SELECT A WINNER TO SEND THE CLUB SCRAP ART ON A STRING KIT TO!!!! FREE!
I'LL SEND A MESSAGE TO THE WINNER NEXT MONDAY. FUN!!!

Thank you for looking and good luck winning the free Club Stamp Kit!
Kay