Wednesday, February 27, 2013

Welcome Up, Up & Away Blog Hoppers!

Creative February Greetings,

Welcome to our first Club Scrap monthly blog hop! Fifteen Club Scrap fans (including me) have joined crafting forces to post something made with the current Club Scrap kit. For this month I am posting yet another version of the February Art On A String Kit, so some of the parts and pieces from my own stash are used to finish off this project. I had so much fun making the other versions that I already posted on my blog earlier this week that I had to make just one more!


Different from the others I made earlier in the week, I simply wrapped this one with black text-weight paper and mounted a family photo on the front.  I used the lid pull hardware included in the kit with ribbon from my own stash.


The kit is called "Art On A String", so it's time for the fun part of lifting the handmade box lid to reveal the strings, or more importantly, what's on the strings.


I never get tired of lifting the lid to see what's suspended inside. The kit comes complete with vintage hot air balloon prints for hanging from the lid (so perfect), but this is my own twist with the photo and rubber stamped quotes from the Navajo Collection. 


There is room for a different photo on the other side. The thread suspended from the lid gets sandwiched between symmetrical photos and stamped panels.


Thanks for stopping by the Club Scrap February Up, Up & Away blog hop! Next on the list is the super lovely & talented Cathy Gray at The Artful Gamut, so be sure to stop by there next :)

Quick, enjoy the last couple days of February while you still can!
Kay

Monday, February 25, 2013

It's What You Make Of It

The month of February is flying by! On the 20th of each month our Club Stamp Kit ships, so the Up, Up & Away Club Stamp Project has found it way to our member's craftrooms now, already! I mentioned the beginnings of this project just two blog entries ago, when I worked up a prototype, so now it's about what this project grew up to be as The Art On A Sting Club Stamp Project, now available online.


Like many projects, it's what you make of it that makes it your own. This project has many possibilities and I enjoyed whipping up a couple variations :)
First, here I have the handmade box wrapped in the vintage balloon print papers provided in the kit. I finished the box off with Up, Up & Away rubber stamps on a couple nested cardstock panels. It may just look like a box wrapped with pretty paper to you at first, but once again, it's what you make out of this box.....

...the lid of the box holds the surprise here.


Little works of art are suspended from the lid. The printed hot air balloons are included in the kit for trimming out, coloring/altering and attaching, it's art on a string -- inside a box.


 I certainly could have stopped there with using the kit contents only for making the project, but I also wanted to use some of my own papers, metal hardware embellishments and rubber stamps to make a couple different looks from the same kit.


See, a completely different look on the same project.


I used Club Scrap's Serenity and Papillon rubber stamps on this project, the ivory paper I used to wrap this project is the plain side of the Club Scrap Logo Printed Gift Wrap.


This is the fun part, lifting the lid.


Side Note -- Man, it's really hard to hold the project still with my left hand as I try to snap the pic with my right! but you get the idea I'm sure.

I used two threads here to hang my rubber stamped butterfly and quote from the lid, using two threads stops the attached stuff from spinning. However I liked using a single thread per hot air balloon in the previous project because there is nothing to read on the balloons, and they simply look cute when they spin after pulling them out of the box.


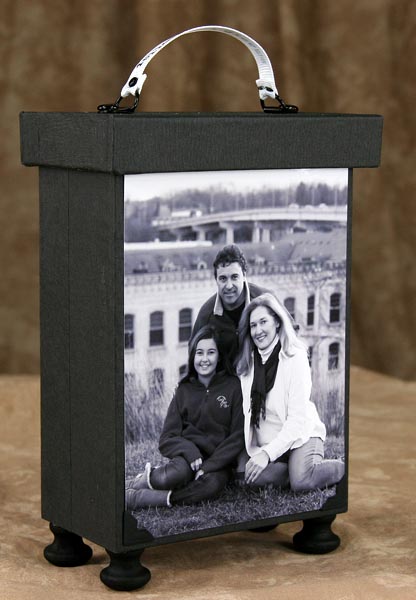
Now lastly, for the project I made with photos inside, first about how I decorated the outside. 


The flip side, plain side, of the printed paper included in the kit is rubber stamped here with the Up, Up & Away Unmounted Rubber Stamps. Then I added color with colored pencils, rubbing on ink, spraying mists and applying glitter glue.


Now again, the really fun part of lifting the lid...


....a couple of photos nest inside this one. Basically I choose/created items that are symmetrical in shape, they can be glued back to back to sandwich the thread suspended from the lid.


Once again, heheee, it's really hard to get the hanging part of the project to stay still for photoing while holding it with my left hand and trying to take the photo with my right hand (no time for a tripod today, too many projects to make). It's really good I have long arms, but please excuse my blurry pic above! 


Another version of this project, that I have in mind but haven't gotten the chance to make yet, is simply decorating the outside of the handmade box by mounting photos on the outside. Maybe I'll get that one put together this week :) Looking forward to it.


It's what you make of it that makes a project special to you!
Thinking this project is a perfect example of that for me:)

FREE KIT ALERT!!!

TAKE ADVANTAGE WHILE I'M SO EXCITED ABOUT THIS KIT -
COMMENT ON THIS BLOG AND ON MONDAY, MARCH 4TH, 2013 I'LL RANDOMLY SELECT A WINNER TO SEND THE CLUB SCRAP ART ON A STRING KIT TO!!!! FREE!
I'LL SEND A MESSAGE TO THE WINNER NEXT MONDAY. FUN!!!

Thank you for looking and good luck winning the free Club Stamp Kit!
Kay


Thursday, February 14, 2013

Happy Valentine's Day!!

 
A last minute Valentine wish to you!

 
Since Club Scrap's February Kit Collection has this great Up, Up & Away theme, and I'm SO into hot air balloons this month, I just had to whip up this heart balloon card. I had the black thread still on the needle on my craft desk from last weeks Jr Stencil Spoiler (so fun) for the Club Scrap Creates Blog, so the needed supplies were handy so why not?
 
Thinking I'll give this card to my daughter, she'll just love it, I hope :)
 
A little about how I made it.


I cut a heart out using the balloon stamp as a starter and guide for heart size. Then used that template to cut out six hearts total, folded them down the center and glued them together.
 
 
Thinking a little stitching would be a cool touch, so I pierced stitching holes in the hearts before gluing onto my card front.


Here I am attaching the hearts onto the stamped card.
 
 
Then pierced a couple more stitching holes and ran the thread through.
 
  
Cute as can be for a last minute Valentine!


Once again, Happy Valentine's Day!!!!
Kay

Wednesday, February 13, 2013

My New Favorite Project!!!

Creative Valentine Greetings To You,


Valentine's Day certainly brings out the crafter in me! I just love it. That being said, I want to show you my new sweet project. Those of you that are Club Scrap Members are familiar with our new Up, Up & Away February Collection, I really enjoy the rubber stamps from this collection and used them for collage style stamping on old dictionary pages. These pages ended up wrapping my handmade boxes. I tore out plain pages from the dictionary for a stamping empty canvas, yet it still has the old paper look (well, because it is old paper, old paper with new stamping on it I guess).


After my handmade boxes were all wrapped, the fun started. I just love this part....
 
 
...wait for it...
 
 
...a string of hearts hang from the lid!  Newly released for Valentine's Day is the Loves Bites rubber stamp collection. The little phrases that fit inside the hearts are the perfect touch.
 
Not being able to stop at just one, I used the Love Bites rubber stamps to make the "insides" that will hang from another box lid.

 
So, here we go again...
..I have a heavy duty crush on this project.. (however I don't think my husband is too worried)..
 
 
...wait for it...
 
 
...ta daaaa... so darn cute!
 
 
Like I mentioned, Valentine's Day seems to bring out the crafter in me, here are a couple other Valentine projects of mine that Scrapbooking.com is featuring in their February issue :
and
 
 
As always, thanks for looking and sharing my love for creative projects on Valentine's Day!
Hope you have time to do something sweet for someone!
Kay

Wednesday, February 6, 2013

Keepsake Book

Creative Greetings,
Quick....before I post a Valentine project or two, I wanted to chat about this fun book I created for Club Scrap's past Holiday Weekend Of Workshops. However as you can see, this one doesn't have a holiday theme to it. I enjoyed wrapping this project with old dictionary inside pages.


The Keepsake Book project that came with Club Scrap's Holiday Weekend of Workshops had a holiday theme to it of course, but now we do have the kit components available in a Paperless (or naked as we sometimes call it) Kit Version so I thought it was a good time to squeeze in a blog about it - so if you are inspired, you could make your own Keepsake Book with already cut components from Club Scrap, or of course, you could whip up your own with a bit more elbow grease and this entry will show you how. The inside of this handmade book contains an accordion album and a box to stash keepsakes inside of.

 
 (Inside the outside covers)
 
 
The inside accordion supplies lots of space for adding photos, journaling, stenciling and rubber stamping. I did a little of all that stuff.
 
 
As usual, I couldn't help myself and just kept decorating.


(love that quote above from Winnie The Pooh)


It's just so fun when a project is completed, I get all picture happy and snap away as you can tell.
 
 Speaking of lots of pictures, I did photo many of the steps while putting this book together, so I'll let the pictures do the construction talking.


As always, thanks for looking and hope you've enjoyed viewing the construction of the Keepsake Book.
 
I better go get ready to make some Valentines!
 
Kay