Thursday, May 31, 2012

Altered Globe

I've always thought globes were cool, and for awhile now thought altering a cheap globe would be fun,
but never got to it until recently.  Here is my now - photo globe.
I came across this clearance globe last year at Target, it was 75% off, so I picked it up with globe altering ideas swimming in my mind. I think the globe ended up on clearance because of the color scheme of the map part not really being attractive, but I really liked the wooden base and metal hardware, 
so perfect for altering. So I finally got to it.
To prepare, I photocopied photographs onto text weight paper (the paper that is in the big copy machines at Kinkos), and collected other printed materials that were already on thin paper (for easier wrapping around the globe). Then I also thought I would rubber stamp a few quotes to also attach.
I ended up using mainly the photocopied photograghs. I cut and tore the portion of the photos that I wanted to use, then spread a thin layer of Club Scrap Book Binding Glue onto the back of the photo, and attached it to the globe. Pressing the text weight paper onto and around the globe,
pressing away any air bubbles as I went along.
This globe is now a fun clever way to have photos displayed in my bookcase, glad I got to it! So let me know if you come across any inexpensive globes, I'll need to make another before too long.
Thanks for stopping by!
Enjoy the day!

Kay

Saturday, May 26, 2012

Operation Write Home Sketch #60

Operation Write Home has given us a choice of 121 card sketches to pick from for their OWH Stars & Stamps Blog Hop Event going on this weekend. I choose sketch #60 shown below.
I grabbed my Club Scrap Time&Space stamps and enjoyed creating the nine 1" squares for the front of this card. I liked the orientation of the sketch, so I just left it as is.


Sending handcrafted greeting cards to OWH (for deployed heroes to write home) is a little way of showing my appreciation for our troops' tireless efforts and sacrifice.
Thanks, OWH for organizing this blog hop!
It seems I have a hard time just leaving it at that, so I have more crafting pics below, but if you are short on time - hop to the next blog. There lots tons to view! 

Here are a few picks about creating this fun card.  I began by using the Time & Space Stamps and Club Scrap's Black India Ink (this ink won't bleed when I use the waterbrush with the colored pencils later).
Now adding a little color...
...and cutting into 7/8" squares...
...matted onto black 1" squares and attached to my card front.


Thanks for stopping by,
Kay Williamson
Club Scrap Design Team


Monday, May 21, 2012

Wood Collage Box Mini Albums


It's hard to believe I made this mini album using these fun wooden boxes almost two years ago and hadn't filled the inside pages until now (again using those wooden collage boxes, that were available, in the past, in Club Scrap's GHM dept. and they were a part of our Chocolate Shoppe Club Stamp project some time ago also, I would think they would be able to be found in craft stores now). Since I had stocked up when they were available at Club Scrap, I continue to enjoy them.
The box starts off bare wood, I used a spray wood stain to color this one and then rubber stamped on the outside flat edges to add more interest. The inside pages are manila tags stitched together. If you are a fan of Club Scrap, you probably have seen this already because I blogged about it back in Feb 2010 on the Club Scrap Community site - however now I actually added some photos and such to the inside pages. I still just think it's so darn cute!


Happy I now have a couple photos and such on the inside because now I feel I can put it on
my coffee table.
I did stitch the manila tags together as a binding on the left and then also, with a long paper in the middle, on the right. This makes the book lay flatter and gives the feeling that it has two front covers, and that it never really has an ending, and I never want good things to end heheeee.

While I'm talking about these mini albums, of course I do have other pics handy that show these same wooden collage boxes in action. Instead of the horizontal orientation like above, I used the boxes in a vertical way below. This one has a completely different look being painted white and was created when our 2010 Feb CS Castaway kit was released. There are more details on the assembly of this one on that old blog link I mentioned above if you are interested. It was a fun little project for adding
vacation memories into.

While we are talking about the wooden collage boxes being used in the vertical way, I also now have this fun completed circle journal shown below. I had a circle of creative pals that were up for doing a circle journal. Since these collage boxes have eight little 1" square nooks for filling, I thought a great theme of the circle journal would be "Favorite Little Things".


So each participant filled a nook on the front or back cover and filled a page stating something about something that is a "favorite little thing" of their's.

Above is an entry about fortune cookie fortunes being one of my favorite little things.

This wooden box was colored with Color Wash sprays and Glimmer Mists which gives a more colorful look compared to the wood stained look. So lots of fun options!

Thanks again for looking,
wishing you a creative day!
Kay

Friday, May 18, 2012

Club Scrap's "Short Sleeve Pants" are a great fit!


Club Scrap has a paper collection called "Short Sleeve Pants", I used it above to make this 12x12 layout. What does that name have to do with scrapbooking paper? Well, really nothing, but it's a cool combination of numeral and wallpaper type designs that don't necessarily "match" but do coordinate wonderfully!
This paper collection fits into my crafting needs wonderfully. The Short Sleeve Pants Paper Collection is very easy to work with.  Being on the design team at CS, I seem to always get projects made with Club Scrap's monthly kit releases, but this is a special addition collection and I don't always get things made with these cool extra collections.

The fun variety of prints, printed cutapart, and coordinating colors makes it a pleasure to craft with, so, since I haven't already and was long overdue, I just had to make a couple of things. I had a couple B&W pics left over from past projects and attached them over the layered up cardstock prints. The Big-N-Tall Upper Case UMs were perfect for the page title/border I thought. I stamped them individually in this case, then trimmed and attached to my page using the handy dandy grid ruler for help on spacing.

NEXT-
While I had the Short Sleeve Pants Paper Collection scraps on my table I kept crafting away. Next came this 4"x4" box with mini album inside.

Using the included printed cutaparts to add interest to my box lid and mini album cover worked well.


The fun prints look so neat put together in a mini album!

Fun prints like these save me a lot of stamping time, this mini album doesn't need much else, just some photos and journaling.

This paper collection is so fun to use for a little project like this, now I need to go fill it with fun pics, or maybe I'll save it as a gift for somebody else's pics and journaling, fun!  Gotta go.
Summer has arrived here in Wisconsin, yeah!
Thanks for looking,
Kay

Thursday, May 10, 2012

Bridal Shower Gift - Handmade Music Box

I knew about my neice's bridal shower for over a month in advance, but of course waited until the night before to make my gift! However, I did have this - handmade music box structure wrapped with their engagement pictures - in mind as a gift well in advance. I think it turned out great, and she really seemed to like it lots! As I mentioned before, the outside is wrapped with the photos I took of the couple after their engagement. To make the photos wrap-able, I simply photo copied the photos onto the text weight paper available in those big copy machines at Kinkos.
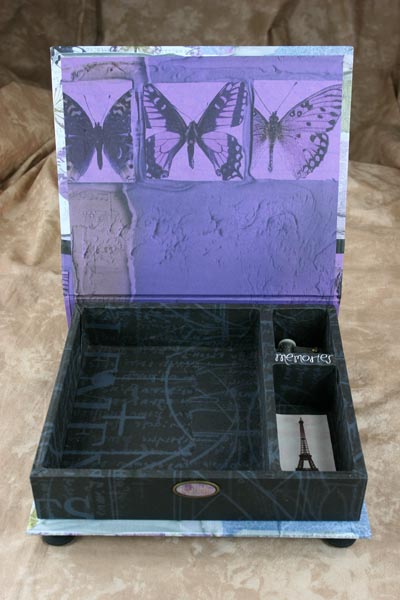
Inside the box is plenty of room for photos, or a mini album, or anything she decides to place in it of course. The music mechanism plays "Fur Elise" which happens to be a song my daughter is playing at their wedding, so it's soooo appropriate, and I just like that tune anyway! The picture below shows the bottom of the box and the music box crank.

I did do a little rubber stamping on the decorative strip attached to the lid of the box, this stamp is from Club Scrap's Versailles collection. It's a long narrow stamp that contains the words "love, hope, moments, etc." so it was perfect for that spot.

It was so worth the time creating this little keepsake for my dear neice, she's the sweetest they come!

While I'm talking about music boxes, I have to mention the "Waltz Of The Flowers" music box kit Club Scrap now has in stock, (as of 05/10/12 anyway). These music boxes (more shown below) were all generated because of that fun CS class I did at last year's retreat, once I had the project all designed, I was still inspired to make more, AND glad there are still kits available so I don't have to hand cut all the pieces to create it like I did before we created the kit!!! Or, one could create their own box and install the "Fur Elise" music box mechanism Club Scrap has available on it's own (just the music box without the rest of the box kit).
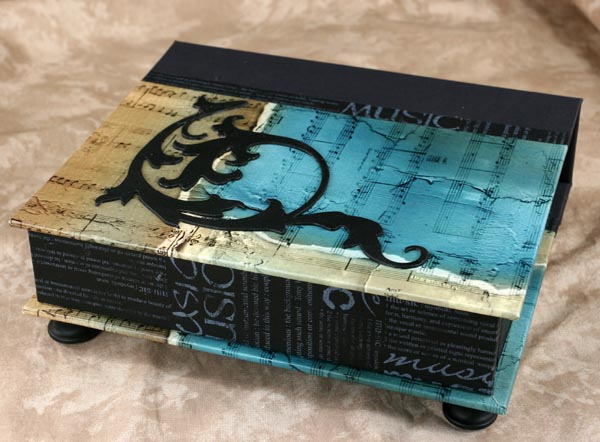
Since I have plenty of pics handy of some of the other music boxes I've made, I'm wanting to add them here too, below is the music box we made during my class. The inside is wrapped with a printed black text weight paper, and the outside was cardstock printed with sheet music images - so you really can make it look any way you want it to.

I really enjoyed making this mini album to fit perfectly inside.

Then of course I couldn't resist actually wrapping the box with sheet music....


and below is the kit available, complete with the papers shown in the pic & the "Waltz Of The Flowers" music mechanism.
The inside can also be decorated differently also, I rubber stamped a coulpe favorite quotes on this paper before attaching it to the box insides.

So you can stick with the papers provided, or use photo copied pictures, or other paper from your stash - lots of options.


I do enjoy wrapping the box with photos as you can see, but then again, the cardstock wrapped box below is also a favorite. Well I'll just keep making more and have new favorites!


Well, hoping you're inspired to whip up a music box of your own!


Hope you have a musical day!
As always, thanks for looking!
Kay