Wednesday, May 29, 2013

Cape Cod Seaside Memory Book Project

Welcome, Blog Hoppers!

Today is Club Scrap's Cape Cod (the May Kit) blog hop, and I'm so happy to be a stop on the hop. If you'd like start at the beginning, the hop originates at the Club Scrap Creates Blog.


Cape Cod's Seaside Memory Book Project
(I used the paperless kit, now just out of stock, and my own papers for this one)
It was wonderful for me to see this project idea come to life as the Cape Cod Club Stamp project. It was a project thought/idea I've had for a while. Now that the project is released, I've continued the fun by assembling a couple of them, each with a different look. This one uses a photo-copied photograph as the front cover wrap as a substitute for the printed paper.


The outside of the project looks just like a regular book on the shelf, but when opened, the inside houses compartments for a mini album and other memorabilia.

So, details on how I used the kit with my own papers:


First I wrapped the front cover with my photocopied image.


I then adhered a black plain paper that was large enough to wrap both the spine and the back cover.


I added a decorative strip to add a little something to the front cover. This Full Circle Cutapart with the printed phrases (from the Full Circle Embellishment Pk) is one of my favorites.


I finished up by adding a black plain inside front cover and then wrapping the inside compartments with printed text weight papers. 


The decorating fun began with photos and other stuff from my stash, including making a mini accordion album to fit into one of the bottom compartments.


I tend to go on and on when I get excited about something--can you tell I'm pretty excited???

This is the original Seaside Memory Book Project using the papers included in the complete kit, so it went together a little faster.


Just one more -- the same project finished off differently.


Your next stop on the Cape Cod Hop is The Artful Gamut. You'll love to see what Cathy is up to today!

Thanks for hopping in.
Kay

Saturday, May 25, 2013

Supporting Our Nations Armed Forces - OWH Blog Hop

Welcome "Operation Write Home" Blog Hoppers!


To check all the Thank You cards created for this blog hop, click HERE to go to where the OWH blog originates! Scroll down a bit to see access to all 146 participants! I'm #86 on the list with this card below. Enjoy the hop!


"Proud As A Peacock & Thankful" are the feelings when thoughts of our Nation's Armed Forces are in our hearts this special weekend. Club Scrap's Peacock collection is perfect for this thank you card going out to OWH. For those of you not familiar with Operation Write Home, check them out by clicking here.


I chose Sketch #B-10 from the OWH Bonus Sketches for this card.


Just a little more about making this card . . .

I used a couple of different ink colors on the same stamp.
Color the stamp with a Faber Castell 's Big Brush Pen for additional detail.
It's fun to see the colorful result.
Here are a my stamped Peacock feathers attached to the card.

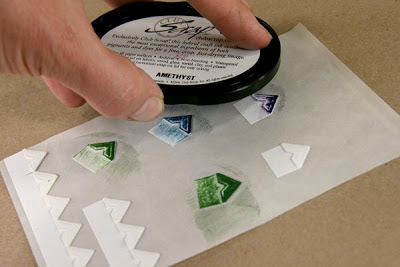
Altered white photo mounting corners.
Adding the greeting.


In honor of this grand Blog Hop, Club Scrap is giving away - FREE - a Peacock Rubber Stamp Sheet to a randomly chosen winner! All you need to do is comment on this blog for a chance to win. We'll be selecting our winner on Friday! Please be sure to include your email in the comment so I can contact you if you are the winner, or send it to kay@clubscrap.com. Good luck to you!

Wishing you a great Memorial Day.
With special thanks to Operation Write Home,
Kay


****05/31  We randomly chose the winner of the Peacock Unmounted Rubber Stamps from the comments below!**** Hope Jen enjoys the free stamps!
This card is totally stunning. LOVE!!! Thanks for the chance to win; I don't have anything like this! Jen

Saturday, May 4, 2013

May 4th - National Scrapbooking Day

Welcome, National Scrapbooking Day Blog Hoppers!


This hop originates from the Club Scrap Creates Blog (in case you want to start at the beginning). Also check out the end of this entry to find out how to win the sheet of unmounted rubber stamps used in this layout!

Check out my fun 8.5x11 scrapbook page with my handsome dh and beautiful daughter . . .


The paper used is from the 2012 Retreat "By The Numbers" Paper Pack from the 2012 Retreat Kit. This collection just went 50% off!!! I just love the subtle earth tones it has to offer! The journaling block and bottom border strip is from the 12x12 Cutapart also found in the kit. The large "1,2,3" number embellishments were created by using the By The Numbers Borders & Backgrounds Unmounted Rubber stamps.

Check out the fun I had while making the number embellishments:

1. Use a foam brush to paint several coordinating colors onto a piece of white cover stock.


2. Once an area is covered with color, blend with light brush strokes of cream acrylic paint.


3. Spray the altered area with your favorite color of metallic or shimmer mist.


4. Stamp the unmounted number image onto the painted area with India Black ink.


5. Trim out the individual numbers with a small detail scissors.


6. Ink the edges of the numbers with a CS® Ink Applicator and India Black ink to hide the white base paper.


7. Layer the numbers onto a scrapbook page with foam adhesive.


Tah-dah! Easy as 1-2-3.

Everyone loves free stuff!
Since Club Scrap wants to share the love of rubber stamping as well as scrapbooking, be sure to leave a comment on this blog to get your name thrown into the hat to win this By The Numbers Borders & Background sheet of rubber stamps. Include an email address if you aren't already a Club Scrap member or shopper. It would be terrible if your name was randomly selected and I couldn't get your shipping address!


Next, check out The Artful Gamet and see what Cathy is up to.

Happy National Scrapbooking Day!
Kay at Club Scrap