Wednesday, December 17, 2014

Club Scrap Holiday Blog Hop

Welcome to my stop on the Club Scrap Holiday Blog Hop!

I used to think it was fun to be a kid at Christmas, but now I know it's even more fun having a kid at Christmas! The pictures I took of Marilee last year show just that. She was so excited to open her presents and this layout preserves that moment for me.


I used the I'll Be Gnome for Christmas Collection for this 12x12" Christmas Morning page. It features wallet-sized photos and a Christmas tree embellishment made from the Gnome Cutaparts and stamped paper scraps.


Here is a bit about how Santa's Elf put this page together.

1. Hand cut a tree trunk from Dark Green and attach a paper strip to create a base for the tree measuring 10" from the base of the trunk to the top. Run adhesive along the strip.


2. Center the 5.5" "Merry Christmas" cutapart to the bottom of the strip.


3. Center additional strips onto the Green base until it is filled. Alternate with colored papers and portions of the printed cutaparts. Don't worry about the edges aligning perfectly until the next step.


4. Trim the tree at an angle from the outside edge of the "Merry Christmas" cutapart to the top of the Dark Green strip. You may find it helpful to identify the center of the Dark Green strip; trim to 3/4" to the left and right of the center mark.


5. Rotate the tree to place it upside down into the trimmer and repeat alignment process to create the same angle on the other side of the tree.

Bottom corner of the cutapart is on the edge of the blade.
Tree top center line at .75" from blade

6. To finish the tree, matte with Dark Green and attach a hand-cut star.


Next on the Holiday Hop is the fabulous Annette at Digital Musings.

Thank you for stopping by during your busy holiday season. I hope Santa is good to you!

Have a blessed Christmas.


Kay


Wednesday, November 26, 2014

Club Scrap Lakes Blog Hop

Thanks for stopping by during the Club Scrap Lakes Blog Hop. If you've just arrived from Hetty's great Craft Chaos, you are in the right place.

This month I've put together an 8.5x11" page using Lakes papers featuring a waterfall technique.

Club Scrap Lakes Collection featuring Waterfall Technique - Waterfall Mechanism Opened
Waterfall Mechanism closed
Since this collection is all about water, I thought I'd use a waterfall technique for adding more photos to my page. Here's a bit about how it went together.

1. Cut six 4.75x3.25" pieces of Dark Teal Plain. Score and fold each piece horizontally at 2.25". (Not in half.)

2. Adhere the back of one short flap to the back of one long flap with the non-folded edges aligned. Repeat to create the waterfall-like structure.


3. Adhere the back flap of the last waterfall page to a 5x5" Light Teal base. Align the folded edge of the flap with the left edge of the paper, and center from top to bottom.


4. Close all of the flapped pages. Adhere a 6.25x3.25" strip to the outside of the first folded page, aligned from top to bottom and centered from left to right. This page will function as a pull tab. Swing the pull tab around to the back, bringing it beneath the 5x5" Light Teal base.


5. Flip over the mechanism and place foam tape onto the 5x5" Light Teal base in a "U"-shaped pattern to create space for the mechanism to work. More than two layers of foam tape may be required.


6. Attach the mechanism to a scrapbook page.


7. Decorate the waterfall with photos and embellishments, and enjoy sliding out the mechanism to reveal each page. This size worked nicely for wallet sized pictures.


I tried so hard to show the page with still photos . . . but I think a little video would give you a much better idea.


Next on the hop is my extremely creative friend Cathy at The Artful Gamut. Enjoy!

Kay

Wednesday, October 29, 2014

A Homestead Halloween!

Thanks for visiting the Club Scrap Homestead Blog Hop.

This month, I've simply created a scrapbook page, featuring the great papers in The Homestead Collection and my Halloween pumpkin carving photos:)


The Homestead color scheme is ideal for Halloween photos.


I used a grid ruler to help tear photo mattes to feature the 5x7" photo. It's my "controlled tearing" technique.


Use several layers of coordinating torn papers to add interest.


Thank you for stopping by. Next on the hop is the talented Cathy at The Artful Gamut. Check out what she's been up to with the Homestead Kit.

Wishing you a creative day, and Happy Halloween!
Kay


Wednesday, September 24, 2014

Blueprints Blog Hop - Stenciled Wall Hanging

Welcome to my part of the Club Scrap Blueprints Blog Hop. If you've just arrived from Hetty's Craft Chaos, you are in the right place.

Wall Hanging Created With Club Scrap Blueprints Stencil
Have you checked out the Blueprints masking stencil? While it's ideal for creating terrific scrapbook pages, I also thought it had some nice potential for creating home decor.


I didn't have time to run to the craft store for the 8x8" canvas I'd envisioned, so I constructed my wall hanging from my stash of book board.


Using a small utility knife, I cut the book board pieces to create an 8x8" front and back and 1.5" deep sides. I even remembered to punch a nail hanging hole centered on the back.


I then used Bookbinding Glue to adhere the pieces and form a frame.


Once assembled, it was painting time. The sides were painted with black acrylic, and ivory on the front wall.


Once dry, I stamped the front of the frame with Black India Ink. Due to the lack of a firm stamping surface beneath the book board, sometimes portions of the stamped image didn't transfer. No worries! If that happens, simply fill it in with a smaller stamped image.


Next, I centered and held the stencil in place on the front of the frame and covered the entire thing with black acrylic paint.


When the stencil is lifted, the stamped ivory surface is revealed. Tah-dah! Depending on what type of crafter you are, go ahead and wash that stencil right away.


Next on the hop is Cathy at The Artful Gamut. She always has something fabulous up her sleeve!


Kay

Wednesday, August 27, 2014

What's The Cinema Without Music?

Welcome to my stop on this Club Scrap Cinema Blog Hop.


I'm on a Stacked Box Project kick, but this Cinema stack of boxes has a musical twist.


During last month's blog hop, Jill P. commented that these stacked boxes could be made into music boxes. Since reading that, I wanted to make one. Thanks, Jill! (But try not to put too many other ideas into my head this month, OK?)


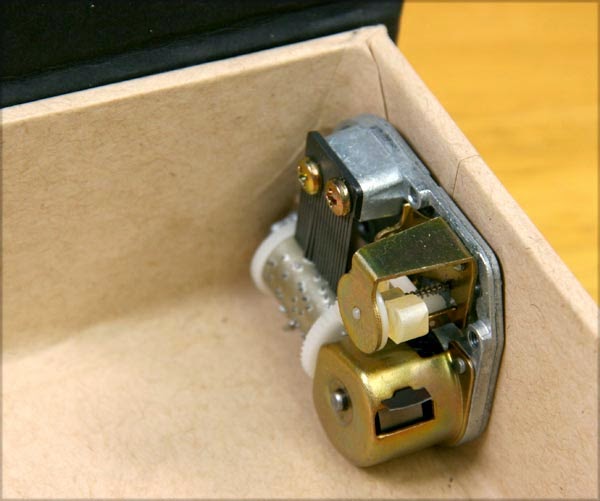
I used Cinema papers for wrapping the covers, text weight kraft for wrapping the inside box, music box mechanisms and the Paperless Components Boxes Kit.

In addition to following the kit instructions, I simply added drilling holes in the book board side wall of each box for the music mechanisms.


If you can find music box mechanisms that play show tunes, woohoo! All the better!


Next, you're off to see the amazing things Cathy has been up at The Artful Gamut. Thank you for stopping and enjoy!

Kay