Showing posts with label handmade. Show all posts

Wednesday, October 26, 2016

Mini Envelope Stitched Book

Welcome to my stop on Club Scrap's Literature Blog Hop.

If you've just come from The Leaf Studio, you're in the right place. If you'd like to start at the beginning, click HERE.

This month I've created a 2-3/4x3-3/4" stitched book with 24 Literature Vintage Envelopes.
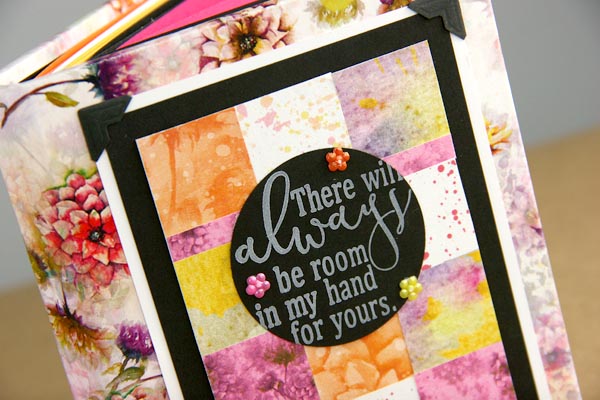
Front

Back

Inside page


Kettle Stitched Binding


How it came together . . .

1. Rubber stamp and decorate the envelopes. They're already printed so they don't need much, but a few quotes and images add to the fun.


2. Pierce stitching holes in the crease of each envelope flap. Stitch the envelopes together with waxed linen thread. Add two paper strips beneath the long stitches to stabilize the spine of the book.


3. Trim and adhere stabilizing strips to the outer envelopes with glue and brads. 


4. Seal the outer envelopes to hide the prongs of the brads and the inner stitches.


4. Add photos to inside pages.


I hope you enjoyed this stop on the hop! Debbie at DebDuzScrappin is next.
Enjoy!

Kay

Wednesday, May 25, 2016

Creative License Blog Hop

Thanks for cruisin' to my stop on the Club Scrap Creative License Blog Hop.


This month I've created a frame with the Creative License Club Stamp Quad Print. The frame holds a picture from a trip to New York City to visit my brother.


I came across a used wooden frame in my basement. The front and sides had been painted medium brown, so I just left it.


1. Cut the Quad Print into fourths. Adhere the pieces to the frame with CS Bookbinding Glue and a foam brush. Completely cover the frame with paper and allow it to dry.


2. Remove excess paper by sanding along the edge of the frame. The distressed edges are a nice touch.


3. Embellish the frame with ribbon, a metal charm, and a personalized license plate made with rubber stamps. (The Creative License Jumbo stamp set is perfect for making custom plates!)


Next on the hop is the talented DebDuzScrappin. Enjoy!!!

I'll leave you with this great Creative License rubber stamped quote . . .


Thank you for stopping,
Kay


Wednesday, April 27, 2016

Dahlia Flutter Book

Welcome to my stop on the Club Scrap Dahlia Blog Hop

I've put together a Flutter Book featuring the Dahlia Club Stamp paper collection.


The printed papers wrap the outside of the book, and the plain papers (plus one sheet of white) completes the inside.


Before I get started, take a moment to Pin the image below so you can find the project when you're ready to make your own flutter book . . .


Cut one 8.5x11 Orange, Yellow, Pink, Black and one additional 8.5x11 White Plain horizontally at 5.5". Score and fold each 5.5x8.5 horizontally at 4.25". Stamp the book pages if desired.

Pierce stitching holes into the fold of each page at .75 and 4.75". Thread a needle with waxed linen and stitch pages together in pairs of matching colors with a simple pamphlet stitch.

Plan the order of the pages in the book.

Nest the page pairs in order.


Trim excess paper from the right edges of the pages to match the width of the first page.


Glue the outside edges of the pink pages to the nearest black page.


Next, glue the outside edges of the black pages to the nearest yellow page.


Continue adhering the yellow to white, and the white to the orange.


To create the cover, trim one .375x5.75" Bookboard Spine and two 4.5x4.75" Bookboard Covers. Trim the 8.5x11 White Club Stamp Print to 7x11 and use to wrap the outside cover/spine, leaving .25" gutter between the spine.

Trim a sheet of Black Plain to 5.5x9.5" and adhere to the inside cover. 

As before, brush glue onto the outside edges of the orange pages.


Adhere to the inside front and back covers.


Decorate the 3.75x5" outside cover panel with a stamped sentiment and squares from the 8.5x11 Quad Print.


Get more Dahlia inspiration from Deb at DebDuzScrappin. Enjoy!

Thanks for fluttering by!
Kay