I've put together a Flutter Book featuring the Dahlia Club Stamp paper collection.

The printed papers wrap the outside of the book, and the plain papers (plus one sheet of white) completes the inside.

Before I get started, take a moment to Pin the image below so you can find the project when you're ready to make your own flutter book . . .

Cut one 8.5x11 Orange, Yellow, Pink, Black and one additional 8.5x11 White Plain horizontally at 5.5". Score and fold each 5.5x8.5 horizontally at 4.25". Stamp the book pages if desired.


Plan the order of the pages in the book.

Nest the page pairs in order.


Trim excess paper from the right edges of the pages to match the width of the first page.


Glue the outside edges of the pink pages to the nearest black page.

Next, glue the outside edges of the black pages to the nearest yellow page.

Continue adhering the yellow to white, and the white to the orange.


To create the cover, trim one .375x5.75" Bookboard Spine and two 4.5x4.75" Bookboard Covers. Trim the 8.5x11 White Club Stamp Print to 7x11 and use to wrap the outside cover/spine, leaving .25" gutter between the spine.


As before, brush glue onto the outside edges of the orange pages.

Adhere to the inside front and back covers.


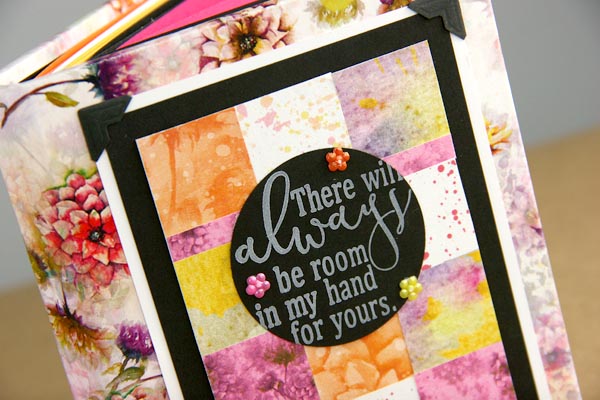
Decorate the 3.75x5" outside cover panel with a stamped sentiment and squares from the 8.5x11 Quad Print.
Get more Dahlia inspiration from Deb at DebDuzScrappin. Enjoy!
Thanks for fluttering by!
Kay

Love this - what a great idea - could use for some of the "senior" celebrations happening soon - if I had a girl that is...my son won't appreciate it! TFS!
ReplyDeleteKay, this is a totally amazing book! I love the happy colors of this kit and it looks smashing in your wonderfool book. I must try this!
ReplyDeleteGorgeous book, as always, Kay!
ReplyDeleteWill you just look at this delightful masterpiece!! Kay you are a genius.
ReplyDeleteWhat a fun book construction, Kay! I can't quite picture it with photos inside and how you go about looking at it, but it sure looks fun. Also, just thinking out loud -- is the spine board measurement really 3.75? Seems like it might be 1.75? Or just .75?
ReplyDeleteOh Pam, thank you so much for the note! Have I told you lately that I love you?!?! The spine with is actually 3/8 x 5-3/4" so with the inches converted to decimal so it's .375 x 5.75", I think I have it all fixed up now. Thank you again and again!
Delete*blushing*
Deletejust trying to help a sistah out...
Well thanks again. I do wish I would have gotten the photos inside in time. When the inside pages of the book aren't pulled out, one can page though it similar to a normal mini album, so it'll work out ok for that too.
DeleteWOW now that is a nifty book Kay!! Love how it reminds me a bit of a star books construction. So cool!
ReplyDeleteOMG Kay, this is so amazing! I need to make one of these!
ReplyDeleteWow! pretty with a great tutorial!!
ReplyDeleteWhat a lovely book! Such a unique binding. Love it!!
ReplyDeleteSuch a fun book, I really like this
ReplyDeleteSo pretty the colors are stunning!
ReplyDeleteGorgeous book Kay. Thanks so much for the idea! Have a great day!
ReplyDeleteCute book, Kay!
ReplyDeleteWhat a unique book structure. It turned out great...thanks for the tutorial!
ReplyDeleteWhat a wonderful book, the colors are spectacular!
ReplyDeletesuch a unique little book!
ReplyDeleteLove it! Nice tutorial too, I can't wait to make one!
ReplyDeleteStunning and fun. Your cover is beautiful and love how the inside comes alive.
ReplyDeleteOk...I know (wink wink) I have never said this before - but your ideas are just AMAZING!!! LOVE IT!!!
ReplyDeleteOh my goodness Kay! You never disappoint. Stunningly beautiful!
ReplyDelete