Showing posts with label shadow box. Show all posts

Wednesday, May 29, 2013

Cape Cod Seaside Memory Book Project

Welcome, Blog Hoppers!

Today is Club Scrap's Cape Cod (the May Kit) blog hop, and I'm so happy to be a stop on the hop. If you'd like start at the beginning, the hop originates at the Club Scrap Creates Blog.


Cape Cod's Seaside Memory Book Project
(I used the paperless kit, now just out of stock, and my own papers for this one)
It was wonderful for me to see this project idea come to life as the Cape Cod Club Stamp project. It was a project thought/idea I've had for a while. Now that the project is released, I've continued the fun by assembling a couple of them, each with a different look. This one uses a photo-copied photograph as the front cover wrap as a substitute for the printed paper.


The outside of the project looks just like a regular book on the shelf, but when opened, the inside houses compartments for a mini album and other memorabilia.

So, details on how I used the kit with my own papers:


First I wrapped the front cover with my photocopied image.


I then adhered a black plain paper that was large enough to wrap both the spine and the back cover.


I added a decorative strip to add a little something to the front cover. This Full Circle Cutapart with the printed phrases (from the Full Circle Embellishment Pk) is one of my favorites.


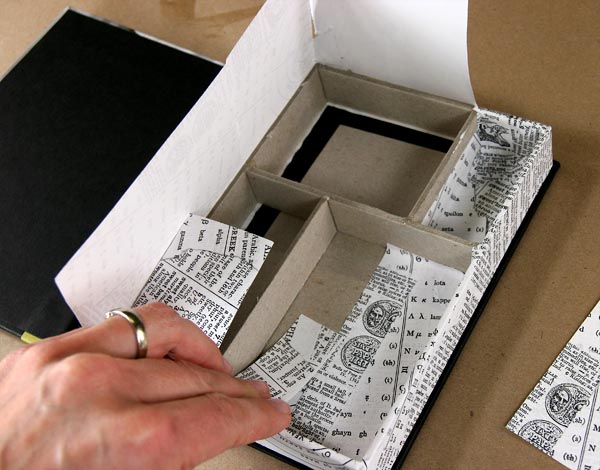
I finished up by adding a black plain inside front cover and then wrapping the inside compartments with printed text weight papers. 


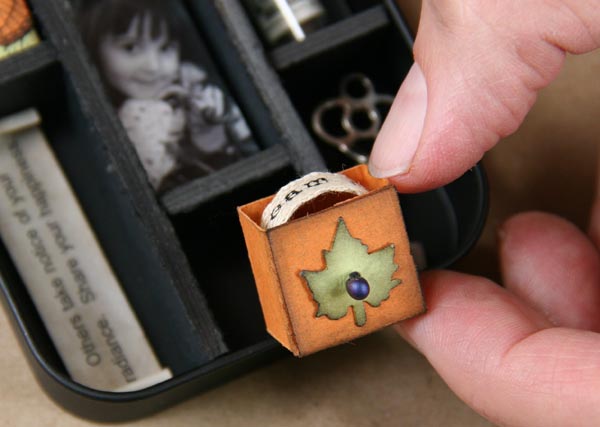
The decorating fun began with photos and other stuff from my stash, including making a mini accordion album to fit into one of the bottom compartments.


I tend to go on and on when I get excited about something--can you tell I'm pretty excited???

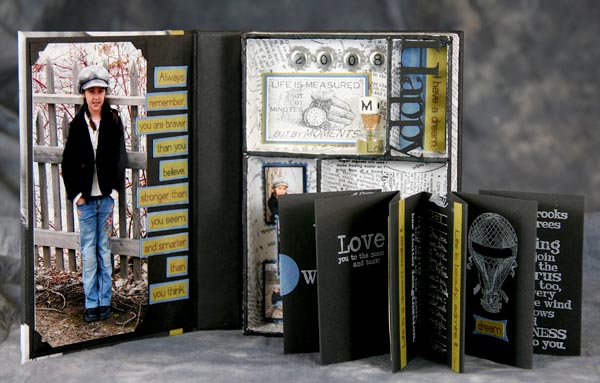
This is the original Seaside Memory Book Project using the papers included in the complete kit, so it went together a little faster.


Just one more -- the same project finished off differently.


Your next stop on the Cape Cod Hop is The Artful Gamut. You'll love to see what Cathy is up to today!

Thanks for hopping in.
Kay

Saturday, March 16, 2013

Shadowbox Tin

Feeling crafting fortunate today, I submitted my shadowbox tin project to Paper Crafts Magazine for their Paper Crafted Creative Ideas For Every Season & Holiday publication, and here it is! in print! going on sale March 19th, 2013. Thank you Paper Crafts Magazine for including my project!!!


I was inspired to make projects with these fun black matte tins when we received them in the October 2012 Peacock Club Scrap kit, so one thing lead to another and I'm still wanting to make more!

This wasn't on purpose, but in the process of putting this shadow box tin together, I think I've crafted the world's smallest drawer!


Since the Black Matte Tins were a goodie in the Peacock Kit, I enjoyed doing projects with them for the Scrap Rap, but then I just kept making projects with this sweet little tin.


I'm going to let the pictures tell most of the construction story, but I started by cutting dividers from black book board.

Once the dividers were in place, I put together the teeny tiny drawers.


Here is the other mini drawer I made for the upper corner of the tin (perfectly sized for fortune cookie fortune storage).
Then it was fun filling in the other compartments with other odds and ends.
I decorated the lid by spreading a thin layer of Book Binding Glue and attaching a color photo-copy to it.


Then used sand paper to trim off the excess paper, followed up with a little brown ink on the edges to give that warm used & handled look.


While I'm talkin' tins, here is a photo tin I put together.


I used the same steps for attaching my photo-copied photo as the lid above. It's amazing how well rubbing sand paper on the edges works for trimming off the excess photocopy.


Lastly, I couldn't resist making an accordion album using Club Scrap's October Peacock Paper in at least one of the tins. Here it is.

With a little rubber stamping on the lid and some button embellishments, it's also really cute! What a different look than the other tins!

Thanks checking out what I've been up to. Wishing you an inspiring day!
Kay

Friday, August 24, 2012

Altered Wooden Tray

Creative Greetings to you! Today I'm posting my wooden serving tray turned shadow box. It started as a bare wood 6"x6" mini tray and looks so different now.
These wooden trays are available in craft stores and even at Oriental Trading by the dozen, so they are an inexpensive option for turning into a cute little keepsake.
I started by painting my bare wood tray with black acrylic paint, then when it was dry, I used sand paper to remove some of the paint on the tray edges for a more distressed look.
 Then I simply rubber stamped words into the bottom of the tray with Club Scrap's White Pigment Ink, and then added more elements from my stash as I went along.
Club Scrap's Just Dandy Stickers made a nice addition, as well as the black and white Vogue Stickers shown below.
 
Along with the photo, cutaparts, stickers, colored Style Stone (Clearsnap), typewriter alpha bead/charms, and feather butterfly - the tray shadow box shaped up.
Thinking this tray really serves up its contents well, now this shadowbox sits on the top of my desk hutch for all to enjoy.


Thanks for stopping Kay's Keepsakes!
Wishing you a most creative day!
Kay