Showing posts with label Altered Box. Show all posts

Wednesday, July 11, 2012

From Thrown Away Gift Box, To Keepsake

Greetings!

I've been away from this blog way too long! However I haven't been away from crafting at all.
I'm also lucky enough to be blogging on www.clubscrapcreates.blogspot.com almost every Friday, fun stuff going on there too!
So for now, I wanted to share a "little matte board book in a bracelet gift box project". Here is how I decorated the kraft box lid - simply painted with black acrylic and layered with cardstock, a photo, some ribbon and big brads from Club Scrap.


The big brads were also used as feet on the bottom of the box.


The project started with finding a disguarded bracelet gift box (sorry to say there was no bracelet found inside hehee, but I liked the box and knew I could put it to good use!)


After I decorated the lid, I wrapped the bottom of the box with old dictionary paper.
Then, cut matte board pieces to make this book shown below to fit inside the box. An old cereal box would work for this book too since it just gets covered with old dictionary papers, photos and acrylic paint anyway, that's what I'll use next time.


The book is held together simply by large 10MM jumprings, usually used for jewelry projects.
This is how it opens.


First from the side, and then from the top and so on.


Here it is all open.


Of course both sides of the matte board can be decorated, making the fold out book that much more fun.


And it all folds up nicely to fit back inside the box.


This disguarded box became a fun little keepsake for me know that I added my own touches. We liked the project so much at Club Scrap that we made a kit out of it sometime ago for our Sonoma Collection, much easier putting it together with all the pieces cut and ready to go for sure, it certainly is fun how all these things get started, like by just finding a disguarded little box in the trash.

Thanks sooooo much for stopping by!

Enjoy your day,
Kay


Monday, January 16, 2012

Calendar Projects - It's A Date

Now that we are well into 2012, I can't get enough of Club Scrap's Navajo Calendar Print. The Cutapart page, that contains two full years, can be made into a calendar project or used sparingly as an embellishment on a scrapbook page. It's a cool versatile goodie I'm glad to have in my stash for under two bucks. So, even though there are more detailed instructions of these projects on Club Scraps 2012 Navajo Online Scrap Rap page, I wanted to blog about it also.  I guess I still have the "Happy New Year" spirit. So here are a couple things I've done with this fun calendar goodie.
It starts as a full sheet for you to do anything with.
At first I thought this goodie's main purpose would be for embellishing scrapbook pages.
It's easy to add a little dimension by bending the mini calendar page around a pen and attaching with foam squares.
Almost forgot about this class trip scrapbook page I did using a mini calendar page as an embellishment. I used it just flat here below.


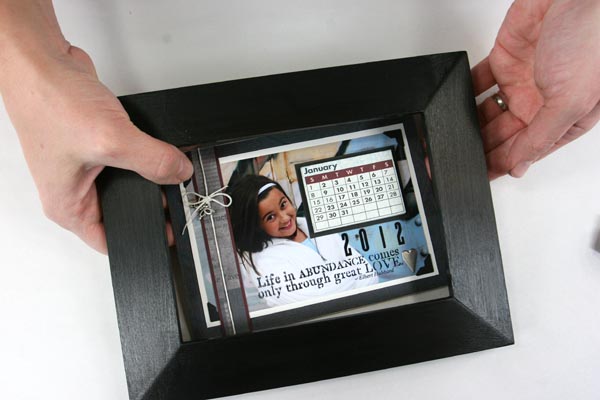
Then I thought a mini calendar on a picture frame project would be fun. I'm all about adding memorabilia to my projects, making them more of a keepsake of course, so this mini tear-off calendar frame popped into my head.

I painted an old frame I was no longer using, matted and embellished a photo and now it sits on my desk. I'll tear-off each month, and will end up with a stamped quote in the frame after the year is over.

Before binding my calendar pages together, I remembered to add a stamped quote on the bottom of the calendar stack, so I'll have that to look at after the year is over.  Then using CS Book Binding Glue and a paper clamp, I adhered one year of mini calendar pages together, after it was dry the glue made the perfect binding for my little calendar.

Then the mini calendar got attached to the matted photo....
...and placed in a frame for desktop viewing.

After enjoying this frame calendar project I felt these mini calendars were just too darn cute to be limited to only a frame project and scrapbook pages. Next came this desktop altered box mini calendar.

After binding the mini calendar pages together, I made a mini eisle to attach to the top of the box.


It's not only cute, but also functional for housing a few often used desk supplies.

I know the year is going to fly by, so glad I've got my fun 2012 calendars in place and out to enjoy.
Thanks for looking, have an inspiring day.

Kay